
TSM Studio (59)
Reclamation
Reclamation is the process of reclaiming unused space on a tape (applies to Virtual Tapes as well). Over time the TSM expiration process will expire old data, creating gaps of unused storage on the tapes. Because Tapes are sequential media, TSM can only write data to the end of the tape, so these gaps of “Empty Space” cannot be used.
Lets see an illustration of this
Tape 1 is a new tape and data is written to it as follows (each number on the following line represents a file being backed up)
1-2-3-4-5-6-7-8-9-10-11-12-13-14-15-16
Over time the expiration runs and expires old files (The * represents an expired file)
1-2-3-*-5-*-*-8-9-*-*-*-13-14-15-16
TSM refers to this space ‘*’ as Reclaimable Space.
TSM can only write to the end of the tape and the Reclaimable Space cannot be reused until all the data on the tapes expires and the tape becomes a scratch tape again.
To view this reclaimable space
QUERY VOLUME volno F=D (where volno is the Volume Number for the Tape ) and look at the Pct Reclaimable Space field.
When using TSM Studio open the Volumes dataview from the Libraries and Volumes Category and view the Pct Reclaim Column

To get back this reclaimable space TSM has a Reclamation process which copies all the valid information from the tape to a new scratch tape so looking at our previous illustration TSM will create the new tape with the valid files
1-2-3-5-8-9-13-14-15-16
This eliminates all the reclaimable space and the old tape becomes a scratch tape.
On each Storage Pool supporting reclamation there is a Reclaim Threshold parameter
Run the QUERY STGPOOL stgpoolname F=D and look at the Reclamation Threshold field
Or when using TSM Studio, open the Storage Pools dataview in the Storage Category and check the Reclaim column

NOTE: For tapes with a value of READWRITE or READONLY in the ACCESS column. TSM will run the reclamation on them when they are FULL, if they are FILLING they will not be touched.
Tapes in an OFFSITE status in a copy pool will be reclaimed whether or not they are FILLING or FULL.
To Change the Reclamation Threshold for a Storage Pool use the following command
UPDATE STGPOOL stgpoolname RECLAIM=xx ( stgpoolname is the storage pool and RECLAIM is the threshold to use )
On TSM Studio right click on the Storage Pool and select Reclamation Threshold and either choose one of the values or use the SET option to choose another value.

As there are a number of admin jobs and backup jobs that all need to use tape drives, you will need to find the right window to run your reclamation processes and decide how many processes you wish to run. Remember that each process will require 2 tapes drives, one for the input tape and one for the output tape. Automatically starting and stopping your reclamation processes can be done with Administration Schedules. ( Check back soon to see an article on Admin Schedules )
ANS0101E Unable to open English message repository ‘dscenu.txt’

This error is being caused because the admin cli “dsmadmc.exe” cannot find its message file. Firstly check that dscenu.txt exists, it should be in the c:\program files\tivoli\tsm\baclient directory ( if you installed the tsm client in the default location ).
If it does exists try adding the following environment variable.
DSM_DIR=C:\Program Files\Tivoli\TSM\baclient
Collocation
Collocation is the process of grouping your nodes together (collocating) to help improve restore performance.
Over time as you add more and more nodes to your environment, the data for these nodes will slowly become more and more dispersed across your tapes as you perform backups. When restoring the data if only a small number of files are required, this will not be a problem but when a restore is needed for a large number of files and those files have become dispersed across a large number of tapes then restores time will become an issue. I have personally experienced an issue when restoring a large volume that took over 2 days when not using collocation.
Instead of having every node’s data being placed on tapes at TSM’s discretion, collocation allows you to define groups of nodes to be stored together on your tapes.
As with everything there is a trade-off, collocation groups will require the use of more tapes but can significantly improve restore times.
Badly configured collocation will cause the consumption of very large amount of tapes. And in my experience this has been the number one cause of the “Where have my all my scratch tapes gone” and “Why do I have so many filling tapes” , we will explore this later in the document.
Collocation is set at the Storage Pool so it is possible to have different levels of collocation based on Storage Pools. As Collocation is really designed to help with Physical Tapes it only applies to Primary Sequential and Copy Storage Pools.
There are a number of difference types of collocation methods that can be used
NO – Collocation is disabled for the Storage Pool
FILESPACE – TSM Attempts to put each file space on its own tape
NODE – TSM Attempts to put each Node on its own tape
GROUP – TSM will put groups of Nodes on their own tapes as defined in the collocation groups. If no collocation groups are defined then the storage pool reverts to Node Collocation.
NOTE: If Group Collocation is set and there are no collocation groups defined or there are nodes not defined in any collocation group then you very quickly run out of scratch tapes and see a lot of filling tapes with not much data on them
Firstly let’s look at how to check to see if collocation is set. From the Admin CLI issue the command
Q STGPOOL F=D and check the status of the collocate field
From TSM Studio open the Storage category and open the Storage Pools Dataview and the check the value in the Collocate column

To change the collocation method being used
Admin CLI: UPDATE STGPOOL COLLOCATE=GROUP
From TSM Studio
Go to the Storage Pools dataview and right click on the storage pool(s) you want to change
and choose Collocation

Choose the collocation method and press Ok

The next thing to do will be create the collocation groups
From TSM Studio open the Configuration category and open the Collocation dataview
Right Click and Choose Add Group

Enter the Group Details and then press Ok

Next Add Members to the Group, From the Collocation Dataview right click the Group and Choose Edit Group Members
NOTE: A Node can only be a member of one collocation group

Simply move nodes in and out of the group and press Ok
Read Here for Trouble Shooting Tips
Recommendations: If you have plenty of tapes and will never run out then use FILESPACE or NODE.
If Tapes are at a premium and you dont care how long a restore will take then dont use collocation
Otherwise you will need to find a happy medium between tape usage and restore times using the Group method. I have seen a number of different methods for collocating node, such as grouping by application type or OS Type. I suggest putting nodes with small amounts of data that does not change very often together and putting nodes with large amounts of data by themselves. For the rest of the nodes try and keep each group from using more that 50 tapes for any node in the group ( this number will depend on the number of drives you have, how fast the library can load the tapes and how fast the drive can move to the required location on the tape) to ensure fast restore times.
I have seen collocation disabled for copypools as a lot of organizations already replicate the critical data to their Business Recovery sites using other methods
As with everything I say in these articles test, test end test again
NOTE: Virtual Tape Libraries do not have the same limitations as Physical Tapes. As the mount times and seek times are negligible collocation can be disabled without affecting restore times.
Reuse Delay
The reuse delay parameter is used to define how long a tape will stay in a pending state. It is specified in days and can be applied individually to primary sequential and copy storage pools (in other words storage pools that handle tapes).
Why do we need this parameter? This parameter is used to ensure that if you had to restore your TSM Database to a previous days backup that the tapes will be in a consistent state with the TSM Database as at the point of the restore.
To Illustrate this, assume that the reuse delay parameter is set to 0 so that tapes become scratch tapes as soon as they are empty.
Monday
A TSM Database Backup is taken on Monday
Tape A1 currently has data for Node ZZ
Tuesday
The data for Node ZZ on tape A1 expires and because the reuse delay parameter is set to 0 tape A1 becomes a scratch tape
Tape A1 is now immediately used to backup node YY’s data
Wednesday
For some reason, you have to restore to the last TSM database backup which was taken on the Monday.
Because the database is now running as at Monday TSM believes that tape A1 holds the data for Node ZZ. A decision is made to restore data for Node ZZ which resides on A1 and TSM complains that the volume is corrupt because the data on the tape is not what TSM is expecting. In this case if the reuse delay parameter had been set to 2 days then tape A1 would not have been written on and the restore would work as expected.
How do I check for the tape status ?
Tapes that are empty but not yet available to be used as scratch tapes have a status of PENDING. To view pending tapes in TSM Studio open the Libraries and Volumes category and double click on the Volumes Dataview. As seen below check the “Status” column and look for tapes in a ‘PENDING” state.


To see when these tapes will become scratch tapes, check the Pending Date. This is the date that the tape went into a pending state. Add the Reuse Delay value to determine when the tape will go from a Pending State to becoming a scratch tape.

To find the Reuse Delay value check the Storage Pool that the Volume is in

Then goto the Storage Pools dataview locate the same Storage Pool name and check the Reuse Delay Column

How do I set the value for this parameter ?
I recommend that you set the value of this parameter to be equal with the number of days or TSM Database backups you keep.
To change the reuse delay parameter from the command line
Update STGPOOL STGPOOL_NAME REUSEDELAY=days
Where STGPOOL_NAME is the name of the storage pool and days is the value for the REUSEDELAY parameter
UPDATE STGPOOL TAPEPOOL REUSEDELAY=2 for 2 days
To change the reuse parameter from TSM Studio goto the Storage Pools Dataview, select the storage pool that you wish to modify, right click to bring up the context menu. Select Reuse Delay and choose the value (in days) you wish to set. Press Ok

I have started TSM Studio but I cant see the TSM Studio Window
Because TSM Studio saves the last known position of the window, it is possible that if the resolution changes, multiple screens were used or the window was accidently dragged off the screen that the TSM Studio is now on a part of the Window Screen that is not visible. To resolve this issue use ALT+CTRL+W to reset the position of the window
TSM Studio Server (3)
TSM Studio Server Security
As of TSM Studio Server version 2.9.1.0 security has been tightened up and no longer stores any security information in the registry.
The default logon to TSM Studio Server is now admin with a default password of password, (Domain field should be blank otherwise TSM Studio Server will assume it is a windows userid).
We strongly advise changing the admin password using the following procedure.
To change the password for the inbuilt admin userid use the Security–>Change Admin Password

Security in TSM Studio Server is now defined by assigning role(s) and Windows groups to a TSM Studio Server security group.
The TSM Studio Server security system will automatically create a group named Admins that has access to all functions in TSM Studio Server, the first time it is loaded it will look for the old group definitions in the registry and load them into this group otherwise it will populate with following default groups Administrators, Domains Admins and TSMStudioAdmins.
Also two roles will be created, one called Administrators which is assigned to the Admins Server group and one called Operational Report Viewer for allowing access to the Operational Report Viewer.
To access TSM Studio Server Groups select Security–>Groups

To modify the Admins Group Double Click or select edit from the Toolbar

Add Windows Group that should have admin access to TSM Studio Server, One Group per line

Microsoft SQL Server settings for TSM Studio Server
If SQL Server is running on the same Server as the TSM Studio Server service then we recommend 12GB of memory as a minimum to ensure the healthy running on TSM Studio Server.
By default SQL Server will be configured to use all available memory this will need to be changed so that there is enough free memory for TSM Studio Server to function. It is recommended that SQL Server be given 4GB of memory and the other 8GB is left available for TSM Studio Server.
To change the default memory settings in SQL Server. Start up SQL Server Management Server right click on the server and select properties

Select Memory and then enter 4096 into the Maximum server memory field

Performance Tuning TSM Studio Server
In TSM Studio Server 2.9.011 and above there are a number of added enhancements to help tune TSM Studio for you environment.
The first area to check is on the Concurrency Tab of the TSM Studio Server properties dialog which can be accessed from Configuration–>Properties as shown here

The main setting to check here are Concurrent Reports and Concurrent Collector Threads. Report creation can consume large amount of memory so it is recommended to keep this number low.

Also some of the collections can consume a large amount of transaction log space especially the activity log collector. Each collector can be individually tuned. Goto Configuration->Collection schedules and edit the Activity Log collector and change the Concurrent Collectors to a small number (less than 5 )

Also check out the below link for SQL Server memory settings
https://spiritsoftware.biz/knowledgebase/microsoft-sql-…-studio-server
Dataviews (10)
Alternate Row Colors
Alternate Row BackColor Example


Using the Alternate Row Color feature can make the data easier to read. After opening a dataview right click to bring up the dataview context menu and select the Alternate Row BackColor option or select it from the Toolbar and the color you wish to use
Customizing the Columns

The columns in a Dataview can be customized in a number of ways,
- Columns can be moved
- Columns can be hidden
- Column Display Text can be changed
- The alignment can be changed
- The format of the data can be changed
To modify the columns right click on the dataview to display the dataview context menu and select columns ( or choose columns from the menu bar ). A dialog will be displayed showing a list of all the available columns and their settings.
Use the up and down arrow keys on the menu to change the order the columns are displayed.
To Hide a field click on the Hidden field for the column to hide.
To Change the Display text for a field click over the text in the Column Display Text field.
Use the Alignment Column to select the alignment for that column.
The Format field is used to the control how the column displays its data for example.
N0 defines a number field with no decimal points.
N2 defines a number field with 2 decimal points.
G defines a date field and shows just the date.
g defines a date field and shows the date and time
These are standard dotnet formats. If you want to have the data displayed in a different way let us know and we will help you format the data the way you want to see it.
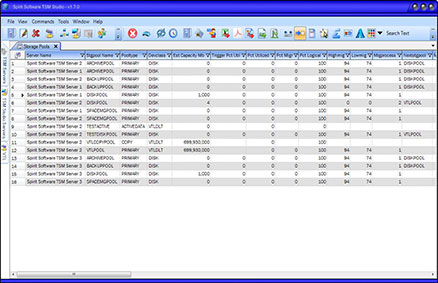
Displaying Line Numbers
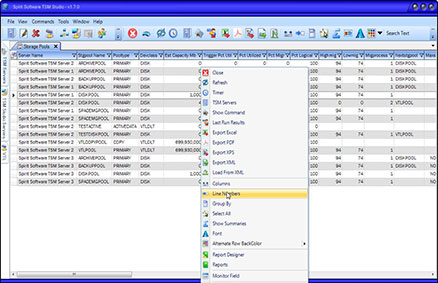
This will display Line Numbers as shown below
Sometimes it is handy to be able to the see line numbers in a dataview.
Right click on the Dataview and select the Line Numbers option from the Dataview context menu ( or from the Main Menu Bar ) to disable/ enable line numbers.
To Enable Line Numbers click on the Line Numbers option from the Dataview Context Menu.
Exporting the Data
From time to time you may wish to export the data from a dataview. TSM Studio provides a number of formats that you can use to export to Excel, PDF, XPS and XML. .
Right click on the Dataview to display the context menu for that Dataview and select from the available Export Options, then choose the ourput file name.
Data exported to XML can be reloaded later using the Load from XML option on the Dataview context menu, this allows you to work offline if you wish.
Filtering the Data
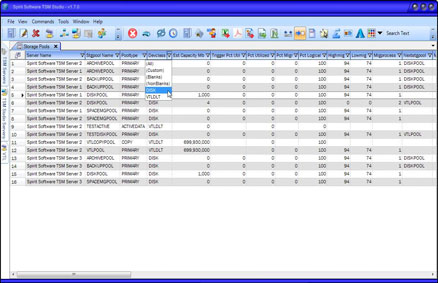
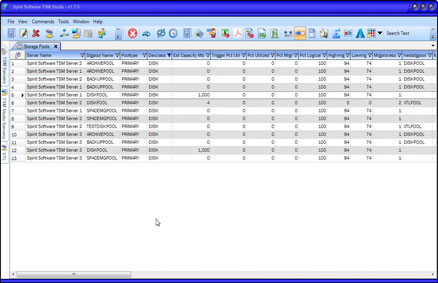
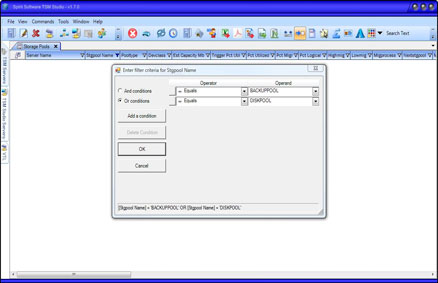
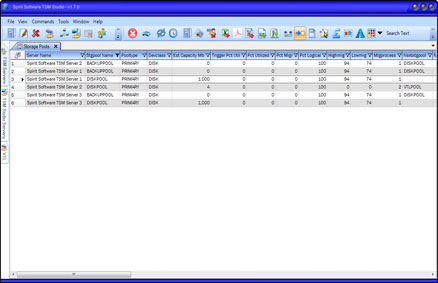
TSM Studio provides extremely powerful filtering capabilities.
At the top of each column on the right hand side where the title is displayed you will also notice a small filter icon. Click on this icon to display the filtering dialog for that column. The icon is only displayed when the mouse is positioned in the column header.
Filtering Examples
Show all rows where Devclass = ‘DISK’
Show all Rows where Stgpool Name is either DISKPOOL or BACKUPPOOL.
TSM (10)
Expiration
Expiring old backup and archive data from TSM is controlled by the EXPINTERVAL in your dsmserv.opt file.
EXPINTERVAL=24 specifies to run the expire process every 24 hours.
EXPINTERVAL=0 disables automatic expiration.
Removing old data from TSM can be run manually using the expire inventory command. Data is expired using the “Management Class” definitions that you have set on your files or if none are defined then the defaults for the policy set are used. ( I will discuss policy sets in an upcoming article )
In version 5 expiration can only be run system wide, in version 6 you can run the expire inventory command on individual nodes, this is useful when changing management classes on individual nodes.
I recommend that you set the EXPINTERVAL to 0 so that you can control at what time this process runs and the setup an admin schedule to run the expire inventory command
Collocation Group TroubleShooting
We suggest you read the following Article on Collocation before reading this Article –> Read Here
As noted in the article on collocation. The main problems you will come across with collocation is running out of scratch tapes andor a large number of tapes in a filling status. The main cause of this is having a storage pool with a collocation method of Group and then having no collocation groups or nodes not in collocation groups.
Using TSM Studio go to the Trouble Shooting category and open the Nodes not in Collocation Group dataview.

To Add a Node(s) to a Group simply right click the select Add to A Group

After putting all your nodes in a group, You will now need to move the data off the current tapes so that TSM can collocate the nodes and their data.
There are a number of ways to do this and here are two of them
1. To do this use the Move Data command on each tape and move the data back to the primary disk pool so that the migration process can move the data back to tape using the collocation you specified.
2. Or use the Move Data command to move the data to the same storage pool as the tape is already in, TSM will then move the data from the selected tape and collocate the data with nodes from the same group on other tapes.
Using TSM Studio to run the move data command. Open the Volumes Dataview from the Libraries and Volumes category Right Click on the Tape and Choose Move Data

Choose the Storage Pool to move the data to

Installing the Administrative CLI – Windows
The Administrative Client is part of the normal windows backup-archive client install but by default it is not installed. You will need to apply a custom install as shown below:
1. Start the Tivoli Storage Manager Client InstallShield(R)

2. Choose the Destination Folder

3. Choose Custom Setup as the Setup Type

4. IMPORTANT – Make sure that you select the Administrative Client Command Line Option as shown below and choose ‘ run all ‘ from my computer

5. Click the Install option

6. To verify the installation, verify the existence of dsmadmc.exe in the C:\Program Files\Tivoli\TSM\baclient directory
You may come across an error if the paths are not correctly set up. If you see the following message when starting the administrative cli program or when testing a TSM Server connection in TSM Studio, follow the suggested action below.
ANS0101E Unable to open English message repository ‘dscenu.txt’
This error is a result of the administrative cli program, “dsmadmc.exe”, unable to find the message file.
To start, you can check if the dscenu.txt file exists in the c:program filestivolitsmbaclient directory ( assuming, you installed the TSM client in the default location ).
If the file exists, try adding the following environment variable
DSM_DIR=C:\Program Files\Tivoli\TSM\baclient
*** Disclaimer ***
All the articles that I have written are from my own personal experiences using TSM for the past 15+ years. TSM is a diverse product that can be setup and deployed in many ways. Before using any of the methods in the articles, ensure that you use due diligence to test that all steps will work as described in your environment.
If you have comments, like help with the contents in one of the articles or would like to see an article on a particular TSM topic please send me an email at gelliott@spiritsoftware.biz. You are welcome to use these articles on your own sites as long as you have a link on the article back to this site
Example: Written by Spirit Software Solutions
Graeme Elliott CEO,
Founder and Chief Architect
Spirit Software Solutions
All Articles are copyrighted by Spirit Software Solutions
*** LEGAL STUFF ***
Direct, incidental, consequential, indirect, or punitive damages arising out of your access to, or use of, the site and articles within. Without limiting the foregoing, everything on the site is provided to you ‘AS IS’ WITHOUT WARRANTY OF ANY KIND, EITHER EXPRESSED OR IMPLIED, INCLUDING, BUT NOT LIMITED TO, THE IMPLIED WARRANTIES OF MERCHANTABILITY, FITNESS FOR A PARTICULAR PURPOSE, OR NON INFRINGEMENT. “Please note that some jurisdictions may not allow the exclusion of implied warranties, so some of the above exclusions may not apply to you. Check your local laws for any restrictions or limitations regarding the exclusion of implied warranties.”
How can I enable VSS Snapshot support on only one windows drive
It is possible to enable VSS on a per drive basis by using the following in the dsm.opt file
INCLUDE.FS C: SNAPSHOTPROVIDER=VSS ( Change C: to the drive letter you require )
Helpful TSM SQL Commands (29)
Show the number of TDP Agents on a TSM Server
TSM v5
SELECT COUNT(*) FROM NODES WHERE PLATFORM_NAME LIKE ‘%DP%’
TSMv6 and above
SELECT COUNT(*) FROM NODESVIEW WHERE PLATFORM_NAME LIKE ‘%DP%’
Show the number of volumes used grouped by Storage Pool
SELECT STGPOOL_NAME, COUNT(VOLUME_NAME) AS VOLUME_COUNT FROM VOLUMES GROUP BY STGPOOL_NAME
Show All Filespaces that have not backed up or did not backup successfully
TSM v5
SELECT NODE_NAME, FILESPACE_NAME from FILESPACE WHERE BACKUP_END IS NULL OR BACKUP_END < BACKUP_START
TSMv6
SELECT NODE_NAME, FILESPACE_NAME from FILESPACEVIEW WHERE BACKUP_END IS NULL OR BACKUP_END < BACKUP_START
Show how many error messages have happened in the last 24 hours
SELECT COUNT(*) AS ERROR_MESSAGE_COUINT FROM ACTLOG WHERE SEVERITY = ‘E’ AND DATE_TIME> ‘YYYY-MM-DD HH:MM‘
WHERE
YYYY = Year
MM = Month
DD = Day
HH = Hour
MM = Month
Show a list of unavailable volumes
SELECT * FROM VOLUMES WHERE ACCESS=’UNAVAILABLE’